Deploy a full-stack application on a server
Whether the server is a VPS or a dedicated server, it is important to know how to deploy an application directly on a server. This can be of interest in several cases, we will see the few cases, and how to carry out
Disclaimer
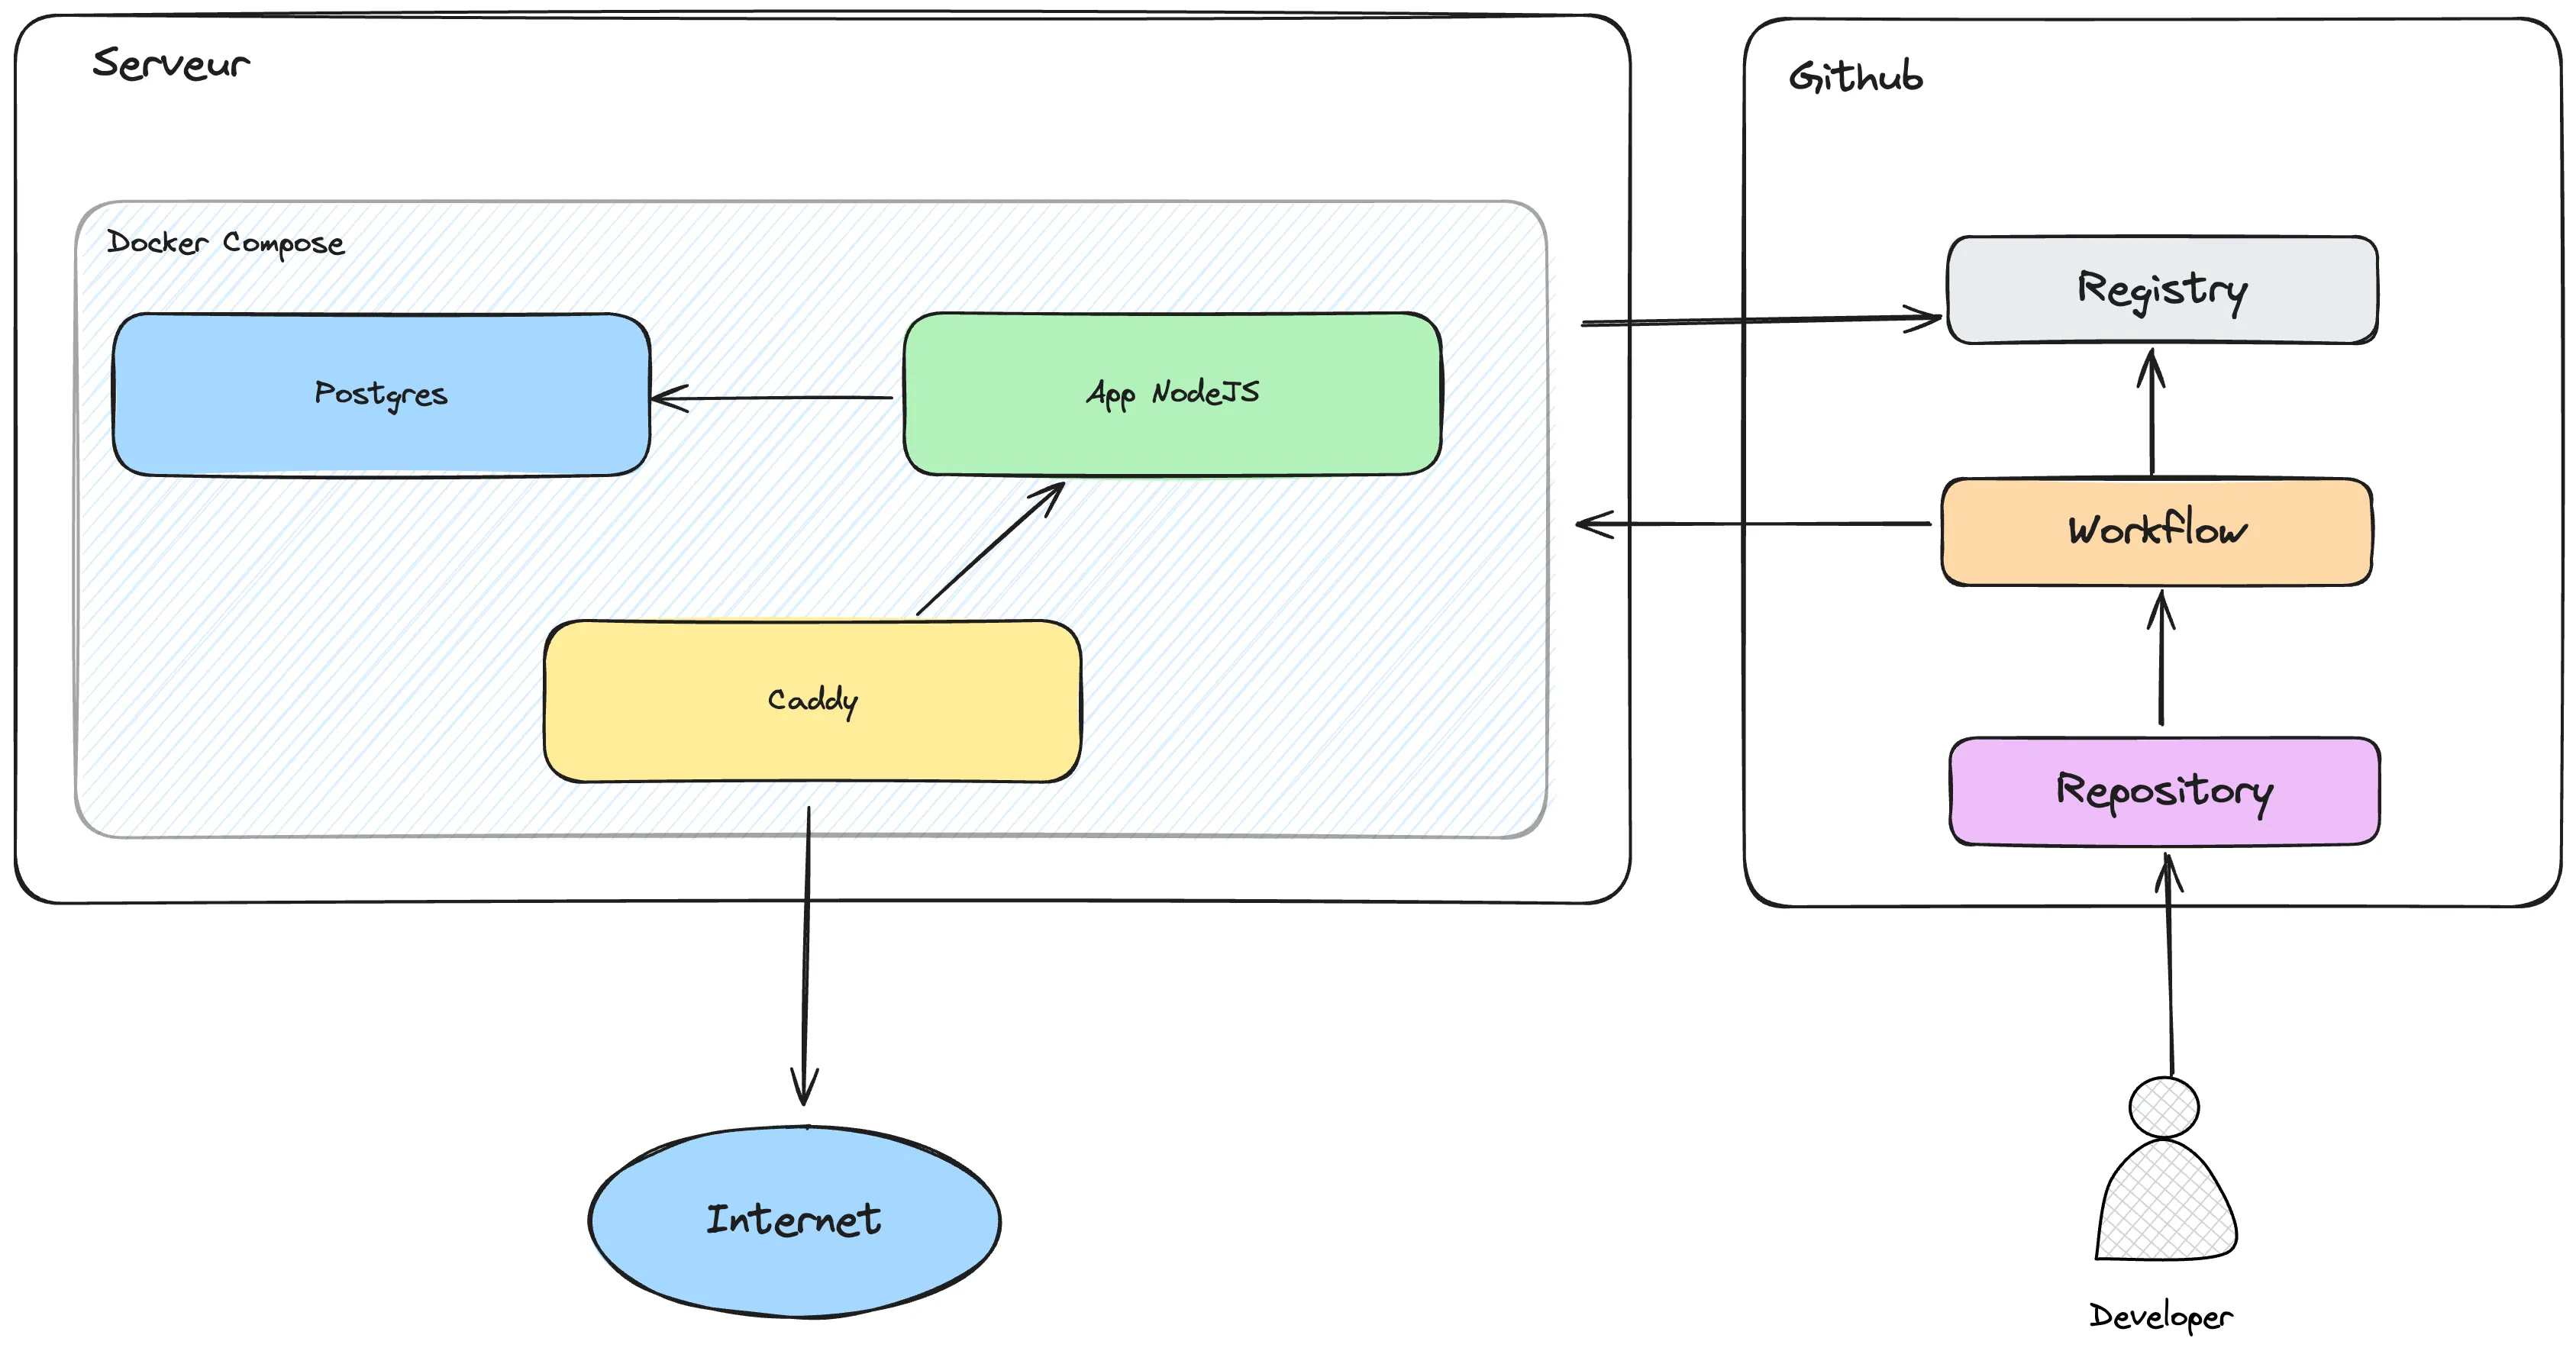
Not everything is perfect. It is not possible to come up with the perfect solution. This suits some, not others. Some points are deliberately neglected on my part. The subject requires digging to get what you want. This is what an automated CI/CD deployment via GitHub looks like for a fullstack Node.js application.
I tried to abstract as much as possible to be as close as possible to a generic solution, but you have to take into account that this takes time and is quite dependent.
I really need it?
Before starting to see how to carry out this task, it is necessary for me to ask a few questions in order to validate the relevance of switching to a server. It is important to carry out this exercise, in this case we determine if the cost is interesting, if the execution is interesting.
We must take into account the cost of the platforms, but also the cost of the time we will spend to carry out this transfer, the maintenance
Does this app perform a lot of actions in the background?
The question is relatively vague, I know. It encompasses several cases. In my case, I’m looking at this question so I can determine: “Do I have a huge cost risk if I put my application on Vercel?” including, “Do I have a lot of interactions with the database?” because it affects the final cost.
With this question, I determine if the budget is consistent with transferring an application from a PaaS service to a server directly.
Is the difference in budget worth me taking the time to maintain everything?
This question raises the point that its services must be maintained. That this can be a long-term commitment.
Prepare the code
Once these questions have been answered, if we still want to prepare the deployment of an application on a personalized server (Again, a dedicated or a VPS does not change much apart from the price), we will have to configure our application to be able to run on our server. In our case, we will use Docker.
Github → Variables
In my case, I need multiple variables from GitHub. The most important being my NPM_TOKEN. I host several private packages in the GitHub registry. You should know that this variable is the same in my case as the one I use to load Docker images. (Locally at least)
Remember to generate your NPM_TOKEN directly on GitHub in your preferences, developer tools: https://github.com/settings/tokens
My token has these rights:
repo*write:packages*
Docker
In my case, I started by working with PM2 to deploy an application directly to the server, but this is not a good practice for a very particular reason:
We are stuck on a server
We are not literally blocked obviously. But the effort for change is too great for us to be ready to make it. Dockerization has a positive effect on this. A new application deployment can be done in 30 minutes (to be broad).
You can very simply change hosting, you can deploy several instances of your service. You can simply switch to an orchestrator (k8s or swarm). Personally, I don’t use k8s, I don’t have any use for them. I operate via docker-compose and if the need arises, I switch to swarm. So far this has not been the case.
The definition of a docker varies depending on the type of project. Here we will see a simple example of a full-stack application. We are not going to go into too much detail about Docker, but I strongly advise you to dig deeper into the subject in order to be able to adapt it to your application and master a subject of significant usefulness.
Here is a simple example of a backend application running on Docker.
https://github.com/MajorTom327/family-server/blob/main/Dockerfile
The most telling example would be this Dockerfile made to allow a Remix type fullstack to run on a server.
# base node image
FROM node:16-bullseye-slim as base

# set for base and all layer that inherit from it
ENV NODE_ENV production

# Install all node_modules, including dev dependencies
FROM base as deps

WORKDIR /app

ADD package.json .npmrc ./
RUN npm install --production=false

# Setup production node_modules
FROM base as production-deps

WORKDIR /app

COPY --from=deps /app/node_modules /app/node_modules
ADD package.json .npmrc ./
RUN npm prune --production

# Build the app
FROM base as build

WORKDIR /app

COPY --from=deps /app/node_modules /app/node_modules

ADD . .
RUN npm run build

# Finally, build the production image with minimal footprint
FROM base

WORKDIR /app

COPY --from=production-deps /app/node_modules /app/node_modules

COPY --from=build /app/build /app/build
COPY --from=build /app/dist /app/dist
COPY --from=build /app/public /app/public
COPY --from=build /app/dist /app/dist

CMD ["npm", "start"]Ressources:
- https://github.com/vercel/next.js/blob/canary/examples/with-docker/Dockerfile
- https://docs.docker.com/reference/dockerfile/
Mettre à disposition les images
Creating a Docker image is good, but now we need to be able to make it available to our future server. To do this, it must be made available on a register. But we don’t necessarily want just anyone to have access to it. So we are going to set up the GitHub registry, a CI/CD pipeline so that our image is built and made available to our server.
The CI/CD pipeline is a special configuration YAML file that is placed in the repository in the .github/workflows folder. This can take any name; in our case we will simply use: .github/workflows/build.yml
Here is a simple pipeline to create our image:
name: CI

on:
  push:
    branches:
      - main
  pull_request:

# These variables are important, they define where we publish the image
env:
  REGISTRY: ghcr.io
  IMAGE_NAME: ${{ github.repository }} # Really important
  NODE_VERSION: 18.x
  NPM_TOKEN: ${{ secrets.PACKAGES_TK }}

# Here, we configure rights to be able to publish.
permissions:
  actions: write
  contents: read
  packages: write

jobs:
  test: # Here, we launch the tests if they exist. This block can be safely deleted.
    name: 🧪 Test
    runs-on: ubuntu-latest

    steps:
      - name: 🛑 Cancel Previous Runs
        uses: styfle/cancel-workflow-action@0.12.0
      - uses: actions/checkout@v4

      # Cache node_modules
      - uses: actions/setup-node@v3
        with:
          node-version: 20
          cache: 'yarn'
      - run: yarn install --frozen-lockfile
      - run: yarn test

  # This is the most important thing here!
  build:
    name: 🛠 Build
    runs-on: ubuntu-latest
    needs: test # To be deleted if no tests
    steps:
      - name: 🛑 Cancel Previous Runs
        uses: styfle/cancel-workflow-action@0.12.0
      - uses: actions/checkout@v4

      # We configure Docker
      - name: 🐳 Set up Docker Buildx
        uses: docker/setup-buildx-action@v3

      # We connect to the register defined in the environment
      - name: 🐳 Log in to the Container registry
        uses: docker/login-action@343f7c4344506bcbf9b4de18042ae17996df046d
        with:
          registry: ${{ env.REGISTRY }}
          username: ${{ github.actor }}
          password: ${{ secrets.GITHUB_TOKEN }} # Automatic in gh CIs

      # We retrieve some information for the definition of the image
      - name: 🐳 Extract metadata (tags, labels) for Docker
        id: meta
        uses: docker/metadata-action@dbef88086f6cef02e264edb7dbf63250c17cef6c
        with:
          images: ${{ env.REGISTRY }}/${{ env.IMAGE_NAME }}
          tags: |
            type=raw,value=latest,enable={{is_default_branch}}

      # We configure the necessary packages (Prisma especially)
      - uses: actions/setup-node@v3
        with:
          node-version: 20
          cache: 'yarn'
      - run: yarn install --frozen-lockfile
      - run: yarn prisma generate

      # Here we will generate the Docker image.
      - name: Build and push Docker image
        uses: docker/build-push-action@4a13e500e55cf31b7a5d59a38ab2040ab0f42f56
        with:
          context: .
          push: true
          tags: ${{ steps.meta.outputs.tags }}
          labels: ${{ steps.meta.outputs.labels }}
          # In my case I have private packages hosted on GitHub, so I need to set this variable
          # To be able to load these packages during build
          build-args: |
            NPM_TOKEN=${{ secrets.GITHUB_TOKEN }}

    # Our image is built here and ready to be put into production
    # This part can be commented out as long as the server has not been established
  deploy:
    name: 🚀 deploy
    if: ${{ (github.ref == 'refs/heads/main' || github.ref == 'refs/heads/dev') && github.event_name == 'push' }}
    runs-on: ubuntu-latest
    needs: [ build,test ]
    steps:
      # We need to configure SSH
      - name: Configure SSH
        uses: shimataro/ssh-key-action@v2
        with:
          key: ${{ secrets.SSH_PRIVATE_KEY }}
          name: id_ed25519
          known_hosts: ${{ secrets.SSH_HOST }} # This variable is defined by us
          # Don't forget to change the values!
          config: |
            Host my_host
              HostName 127.0.0.1
              User majortom327
              Port 22
              IdentityFile ~/.ssh/id_ed25519
          if_key_exists: fail
        # We use the previous configuration to apply the changes
      - name: Upgrade server services
        run: ssh my_host "cd services ; docker compose pull ; docker compose up -d"
This pipeline will only run when we push on main. Remember to look at the configuration carefully, understand it and update it according to your needs.
You will also need to ensure in the configuration of your project on GitHub that the workflows are activated and that the packages are too.
The deployment part will be reviewed in detail in the server part
Services
The notion of service can be quite vague. This is what your application needs to work.
In my case, I always put a docker-compose.yml in my repo so that I can launch whatever is necessary for my application. If this is not your case, try doing it, it’s a game-changer in development.
Here is a simple default docker-compose for my applications using Postgres:
version: '3'
services:

  postgres:
    image: "postgres:latest"
    restart: always
    ports:
      - "5432:5432"
    volumes:
      - ./local-data/postgres:/var/lib/postgresql/data
    environment:
      - POSTGRES_PASSWORD=postgres
      - POSTGRES_USER=postgres
      - POSTGRES_DB=dev

# A tool for reading the database, still available in development if needed!
  adminer:
    image: adminer
    restart: always
    ports:
      - 8080:8080
    environment:
      - ADMINER_DEFAULT_SERVER=postgres
      - ADMINER_DEFAULT_DB_HOST=postgres
      - ADMINER_DEFAULT_DB_DRIVER=postgres
      - ADMINER_DESIGN=dracula

  # app:
  #   build:
  #     context: .
  #     dockerfile: ./Dockerfile
  #     args:
  #       - NPM_TOKEN=${NPM_TOKEN}
  #   restart: always
  #   depends_on:
  #     - postgres
  #   environment:
  #     - DATABASE_URL=postgres://postgres:postgres@localhost:5432/dev
Note that this Docker Compose also contains the settings to run the application locally if necessary!
Configure your server
Setting up a server is a long, painful task that can take a lot of time. Optimal settings must be maintained, both in operation and in safety. I can’t tell you “Here is a 100% secure configuration”, for two reasons, already it’s a basic configuration I don’t want to spend 150 years on it, then nothing is 100% secure and you have to be aware of that . Everything can end up getting hacked one day. This does not mean that we should not make the effort not to be so, but that we must be aware of it and precisely keep external dependencies to a minimum.
The server
To begin, you must choose a server distributor. It could be OVH or another. In my case, I choose UpCloud (Referral link) which is not free for me and you can find cheaper elsewhere, but has the advantage of being on a pay-as-you-go model. That is to say, as soon as you delete a server, you no longer pay for it. So you can create servers for testing, tearing them down, and learning easily.
(It’s also a European cloud 🇪🇺)
Upcloud allows me to configure a new server basically with a script and an SSH key so that my server is functional from the start, this is what my initialization script looks like
#!/bin/bash
export USERNAME=vthomas
export SSH_PUB="" # Clef publique SSH
export CR_PAT="TOKEN" # Token Github

# Update system
apt-get update
apt-get upgrade -y

# Install base tools

apt-get install -y zsh vim curl git

########## Configure SSH ##########

# Configure a basic user
adduser --disabled-password --gecos "" $USERNAME
usermod -aG sudo $USERNAME

echo "$USERNAME ALL=(ALL) NOPASSWD:ALL" >> /etc/sudoers

cp -r ~/.ssh /home/$USERNAME
echo $SSH_PUB >> /home/$USERNAME/.ssh/authorized_keys
# Set the owner of the .ssh directory and the authorized_keys file
chown -R $USERNAME:$USERNAME /home/$USERNAME/.ssh

# Set the permissions of the .ssh directory and the authorized_keys file
chmod 700 /home/$USERNAME/.ssh
chmod 600 /home/$USERNAME/.ssh/authorized_keys

# Disable root SSH login
sed -i 's/PermitRootLogin yes/PermitRootLogin no/g' /etc/ssh/sshd_config
# Disable password login
sed -i 's/#PasswordAuthentication yes/PasswordAuthentication no/g' /etc/ssh/sshd_config
# Disable PAM
# sed -i 's/UsePAM yes/UsePAM no/g' /etc/ssh/sshd_config
service ssh reload

########## Shells ##########

# Set user shell for zsh
chsh -s /usr/bin/zsh
chsh -s /usr/bin/zsh $USERNAME

# Install Oh My Zsh
echo 'wget https://raw.github.com/ohmyzsh/ohmyzsh/master/tools/install.sh' > /home/$USERNAME/omz_install.sh
echo 'sh install.sh' >> /home/$USERNAME/omz_install.sh
echo "sed -i 's/ZSH_THEME=\"robbyrussell\"/ZSH_THEME=\"blinks\"/g' /home/$USERNAME/.zshrc" >> /home/$USERNAME/omz_install.sh

chmod +x /home/$USERNAME/omz_install.sh

echo "export CR_PAT=\"$CR_PAT\"" >> /home/$USERNAME/.zshrc

########## Docker ##########

# Install docker
curl -fsSL https://get.docker.com -o /tmp/get-docker.sh
sh /tmp/get-docker.sh

# Install docker-compose
apt-get install -y docker-compose

# Install docker-compose completion
curl -L https://raw.githubusercontent.com/docker/compose/1.25.0/contrib/completion/bash/docker-compose -o /etc/bash_completion.d/docker-compose

# Add user to docker group
usermod -aG docker $USERNAME

########## Firewall ##########

# Install ufw

apt-get install -y ufw

# Configure ufw

ufw default deny incoming
ufw default allow outgoing
ufw allow ssh
ufw allow http
ufw allow https
ufw allow 53
ufw allow 53/udp
yes | ufw enable

# Configure fail2ban

cp /etc/fail2ban/jail.conf /etc/fail2ban/jail.local
sed -i 's/bantime = 10m/bantime = 30m/g' /etc/fail2ban/jail.local
service fail2ban restart

apt-get install -y rsync
echo $CR_PAT | docker login ghcr.io -u majortom327 --password-stdin

reboot
I don’t think this script is perfect. On the contrary. But this allows me to have a functional environment directly.
I don’t think this script is perfect. On the contrary. But this allows me to have a functional environment directly.
The services
Once this is done, I can finally connect to my server and finish configuring my service.
mkdir services
vim docker-compose.yml
The configuration of my docker-compose is relatively similar to the one we saw above:
version: '3'
  services:
    postgres:
      image: "postgres:latest"
      restart: "always"
      volumes:
        - ./local-data/postgres:/var/lib/postgresql/data
      environment:
        - POSTGRES_PASSWORD=GUID
        - POSTGRES_USER=GUID
        - POSTGRES_DB=dev
    app:
      image: ghcr.io/user/repository:latest
      restart: always
      volumes:
        - ./logs:/app/logs
      depends_on:
        - postgres
      environment:
        - DATABASE_URL=postgres://GUID:GUID@postgres:5432/dev?schema=public
I use GUIDs as a username and password on some services (mainly if I’m exposing anything). To generate a GUID, the uuidgen command is your ally (available on Mac by default).
In this case, we have the service which works by default, which is connected but we have no access from the outside. To provide external access, I use Caddy with a Caddyfile:
example.com {
  reverse_proxy: app:3000
}
Note that you must have the domain name example.com in order for this to be correctly configured in HTTPS for production.
caddy:
  image: caddy:latest
  restart: always
  ports:
    - "80:80"
    - "443:443"
  volumes:
    - ./Caddyfile:/etc/caddy/Caddyfile
  depends_on:
    - app
Once that’s done, I just have to launch everything via:
echo $CR_PAT | docker login ghcr.io -u majortom327 --password-stdin
docker compose pull
docker compose up -d
Which allows me to start the services in the background and have everything running.
I can verify that my service is working correctly via: docker-compose ps
I personally have a script that allows me to update my services, this allows me in particular to ensure that old, more up-to-date images are not on the server.
echo $CR_PAT | docker login ghcr.io -u majortom327 --password-stdin
docker compose pull
docker compose up -d
yes | docker image prune -a # Clean les anciennes images
La connexion
Now that the service is connected to the Internet, the CI configuration may need to be reviewed to ensure that the CI correctly publishes the service to the server.
deploy:
    name: 🚀 deploy
    if: ${{ (github.ref == 'refs/heads/main' || github.ref == 'refs/heads/dev') && github.event_name == 'push' }}
    runs-on: ubuntu-latest
    needs: [ build,test ]
    steps:
      # We need to configure SSH
      - name: Configure SSH
        uses: shimataro/ssh-key-action@v2
        with:
          key: ${{ secrets.SSH_PRIVATE_KEY }}
          name: id_ed25519
          known_hosts: ${{ secrets.SSH_HOST }} # This variable is defined by us
          # Don't forget to change the values!
          config: |
            Host my_host
              HostName 127.0.0.1
              User majortom327
              Port 22
              IdentityFile ~/.ssh/id_ed25519
          if_key_exists: fail
        # We use the previous config to apply the changes
      - name: Upgrade server services
        run: ssh my_host "cd services ; ./update.sh"
You will need to make sure to set the SSH_PRIVATE_KEY variable with the contents of the SSH key you want to use to connect the server. I advise you to have an SSH key dedicated to CI/CD only. Even CI/CD and by project.
The SSH_HOST is a variable to be defined from the value that we have in the known_host.
It is easily possible to obtain it via this command (Change the IP of course):
cat ~/.ssh/known_hosts | grep 127.0.0.1